
Manufacturer of pipe technology solutions

Professional plastic pipe extrusion machinery manufacturer
- Any Questions?[email protected]
- Get in Tough+86-13601562675
Professional plastic pipe extrusion machinery manufacturer

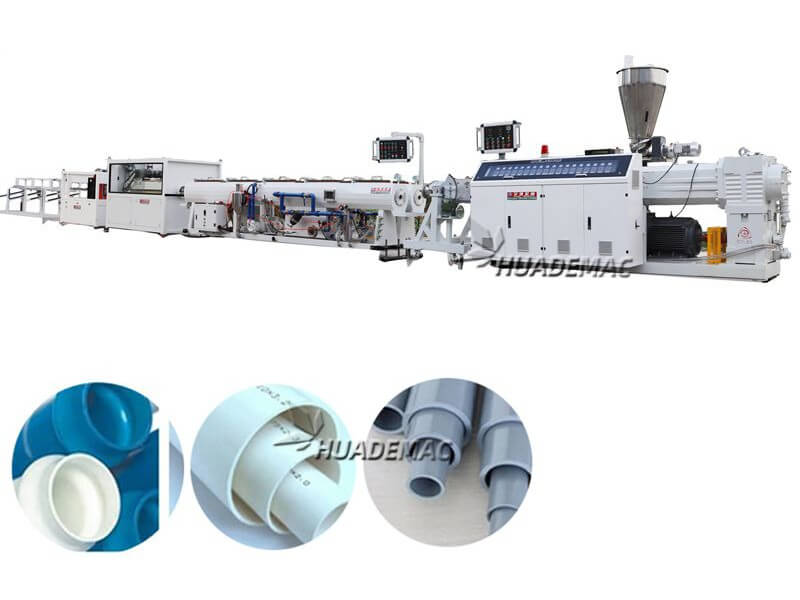
PVC pipe extrusion operation is as follows:
1. Check the gear box of the main engine and whether the throttle of the reduction box is normal;
2. Check whether all parts of the main engine and electrical appliances work normally, and check whether the drainage is open and whether the compressed air pressure is normal;
3. Check whether the main body shield is clean;
4. Check whether the screw cooling oil circuit is smooth;
5. Check the sensitivity of all operating switches and whether the governor is zero, and whether the emergency stop is in place;
6. The mold worker is responsible for replacing the mold, and carefully inspecting the heating ring of the die head to confirm that it is normal before delivering it to the operator for use.
1. Turn on the main power switch, open the screw oil pump of the extruder and the water supply valve. Make sure that the mold is suitable, the nozzle is smooth without clogging, the height of the supporting roller is suitable, the vacuum glue can block the vacuum, the pressure of the tractor is moderate, the cutting machine clamps the block, the knife feed is suitable, and the flaring machine is normal.
2. Turn on the heating power switch of the extruder, set the temperature of the heating section and the temperature of the screw to be 70 °C, and the other sections to be 130 °C (Note: the small mold is heated for 1 hour, and the large mold is heated for 1.5 hours)
3. When the temperature of each section reaches the above set value, the temperature of each heating section will reach 150 °C, and the bolts should be tightened again for the newly replaced mold.
4. When each heating section reaches 150°C, set each temperature to 5-10°C lower than the data required for production, and the temperature of each section cannot be lower than 150°C. (Note heating for 0.5 hours)
5. Start the twin-screw, and slowly and evenly start to clean the machine material. The screw speed should not exceed 30% at 0-5r/min load.
6. According to the temperature display data and according to the humidity to determine the material arrival position and gradually increase the speed. While increasing the rotation speed, observe the change of the current of the host machine. If the current is stable, continue feeding. If the current continues to rise, slow down the feeding, and wait for the current to stabilize before feeding.
7. Determine the cleanliness of the barrel and die head by the inner and outer surfaces of the cleaning material. When the cleaning material is cleaned and the temperature has reached the production value, stop adding the cleaning material, open the feeding system, and adjust the feeding speed by controlling the torque at about 40% (40% of the normal production current value).
8. Until the material flows out of the die head, adjust the screw until the thickness is uniform. (Note: The material coming out of the die should be pulled off immediately, not too long or piled up in a ball)
9. When the extruded material is difficult to pull apart by hand, prepare for traction, start the vacuum pump of the extruder, and adjust it to the normal value.
10. When the material enters the vacuum setting cylinder, start the water pump immediately, and adjust the traction speed to reach the normal state.
11. When the whole line of the pipe has passed through the vacuum water tank and is on the tractor, turn on the water spray volume, turn on the vacuum pump of the vacuum setting box, and adjust the vacuum value to about 0.4par.
12. When the round tube passes through the cutting machine, the cutting machine can be turned on to the automatic state.
13. Measure the tube production and wall thickness, observe the quality of the inner and outer surfaces of the tube, and adjust the corresponding parameters. When the qualified products are produced to the tractor, put the printer and start printing.
1. When it is found that the water is cut off and erected, the parking steps should be taken to deal with it.
2. Power failure (more than 20 minutes) - when a power failure is found, the power supply should be cut off immediately, the material of the die head should be cut off, the mold removal process should be carried out according to the mold disassembly and assembly steps, and the valve should be closed. When a short-term power failure is found, follow the normal power-on steps.

Manufacturer of pipe technology solutions


Visit us
Leyu Town, Zhangjiagang City, Jiangsu Province, China

Call us
+86-13601562675
Fax us
+86-13601562675

Send us an Email
[email protected]